
Since the end poles are attached to the roof supports and those end poles are connested by 13 one-peice solid 1/4" rods, the whole rail is like a continuous net of steel under tention. The lateral strength should exceed the requirements, but if on the long sections we find it flexes too much, I can add a lateral outrig support to the center to fix that.
Remember that most structures around us, including all the homes, are built out of douglas fir or an equivilent, and exterior paint is all that's required to keep them stable from the elements. But it will need recoated every couple years - about a 2 hour job.
Redwood is better, mostly just because the bugs don't like it, which I don't expect to be problem anyway. Using Redwood 2 x 8s would add about $200 bucks to my quote. Still not expensive.
Regardless of the wood, I think the secret is in the finish. Using something tough and UV resistant (not clear) will keep it long lasting regardless.
Gazebo Completion (Le coup de gras)
Moderator: Chip

-
skygeek AKA Seabass

- Posts: 252
- Joined: Thu Dec 21, 2006 9:34 pm
- Location: Newhall
- Contact:
-
gregangsten

- Posts: 502
- Joined: Thu Jun 02, 2005 11:22 am
- Location: Westchester
Railing lengths
These don't all have to be 18' long. Can we come up with a tally of what lengths will be needed so we can get accurate costs?Glenn wrote:I estimate that with waste we will need about 160 ft of cap material.
-
gregangsten
- Posts: 502
- Joined: Thu Jun 02, 2005 11:22 am
- Location: Westchester
Ipe cost
I got a quote of $814.80 for 5/4 x 6 (true 1" x 5 1/2") for 160 feet of Ipe for the top.
I'll bring a sample to the board meeting on Thursday.
I'll bring a sample to the board meeting on Thursday.
The total length is about 142 ft. The longest span between roof supports is 209 inches and there are three of them, and one that's 192". The rail posts are 6' apart with an additional light vertical support every three feet.
All spans can be one-piece by use of four 20 ft boards and seven 12 footers. That equals 164 feet total material needed. We don't necessarily need one-piece spans.
I have ways of dealing with a seam that will keep it strong anyway, but one-piece would be nice and the difference in waste is minimal.
The cap material must be no less than 1.5" thick, or the rail will not meet the code requirement of 42", which was the inspector's main concern. I've already completely finished all the supports, so changing the height of those to accommodate thinner material is out of the question. I also would recommend against anything weaker than a common 2 X 8. The design is a bit dependent on the rail cap being at least that strong.
Last edited by Glenn on Mon Oct 10, 2011 2:58 pm, edited 2 times in total.
Flyyyyy
To summarize:
Current rail cost = $1800 complete
Douglas Fir: Added cost = $ 0.00
Redwood: Added cost = $ 200.00
Stainless capped Fir: Added cost = $ 700 (I sharpened my pencil.)
Plastic composite: Added cost = $ 900 and up
The two low cost alternatives will require a couple hours of maintenance every year or two.
The two expensive alternatives will not require maintenance, but will have the risk of expensive replacement cost if they get damaged by vandals.
Personally, I expect damage and therefor prefer either cheaper alternative. And, remember that even a metal roof is going to have a lot more wood in it than the rail will.
A side note: The stainless steel cap could incorporate art work as I've shown, which could be commemoration of people and events, or just aesthetics. Unfortunately, I also think a stainless cap would be the most likely to be vandalized.
I expect to be in the LZ early tomorrow to do some welding of a few of the brackets to the roof supports to test how that works before installing the rest of them later in the week.
Flyyyyy

If the redwood has the same characteristics as cedar, then I think it is a choice worth considering. I have a cedar bench in our back yard I made ten years ago and it has never been treated. It looks weathered, but other then that, it is in great shape.
Glenn is right in the fact that it would take little effort to maintain it. If the plastic is exposed to sun often, in time it will look cheap. The redwood meets the 1.5 inch required by the inspector and the continuous eighteen foot lengths that were pointed out as a requirement by Pi-Hsuan's engineer. From $1800.00 to $2000.00, no big deal. It is not only easy on maintenance, and our wallets, but meets everything to pass inspection.
Thanks Glenn.

http://www.amazon.com/Lexol-Vinylex-Rub ... B00063ZIT4
I use this Lexol Vinyl Rubber and plastic cleaner protectant on the plastic trim of my car and its held up pretty good. It has a strong UV screen too. Works pretty good keeping it looking new.
Doug
I use this Lexol Vinyl Rubber and plastic cleaner protectant on the plastic trim of my car and its held up pretty good. It has a strong UV screen too. Works pretty good keeping it looking new.
Doug
-
Ken Andrews
- Site Admin
- Posts: 215
- Joined: Mon Jun 06, 2005 8:22 pm
- Location: Pasadena
Roof model
As I posted earlier in this thread, three roof designs are under consideration: skylights as shown in our approved plans, cupolas to preserve the architectural concept without the cost of skylights, or basic hip roofs for simplicity. My web surfing indicates that the architectural pyramid skylights called for in the first option would cost about $5K each, or $20K for four of them. Supposing that's more than we want to spend, the first option is out.
In order to form a useful opinion among the remaining two options, I found that I needed a better idea of what each would look like. So I spent a bunch of evenings building a scale model of two roof units, one with cupola, and one without.
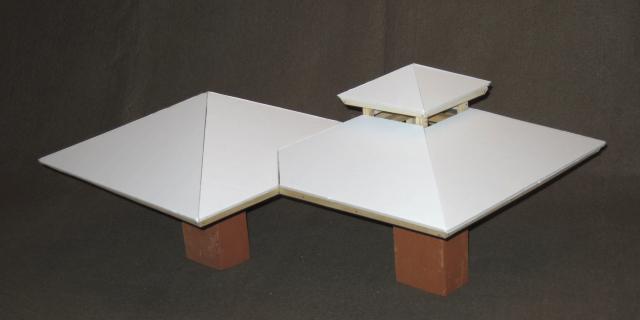
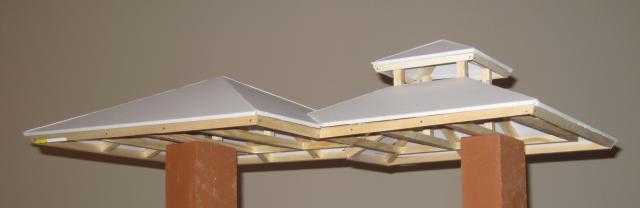
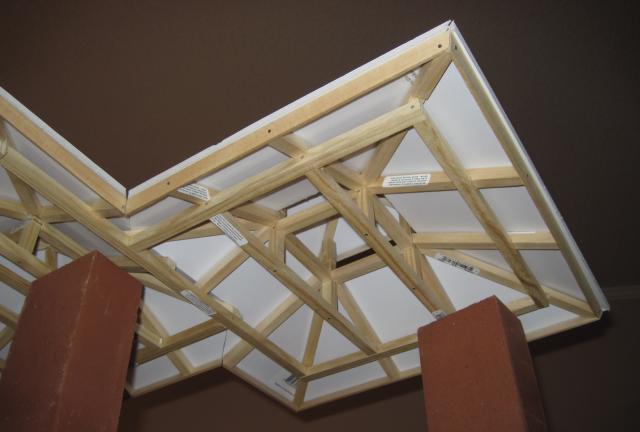
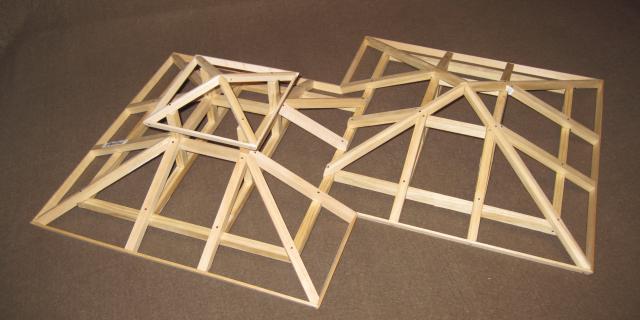


The main beams are 6x6, the cupola hip rafters are 4x4, and the roof surface will probably be 2x8 tongue-and-groove planking. The model is fairly precise in scale (12:1, a foot to the inch) and in the details, so hopefully it helps to visualize how the roofs intersect, how the beams fit together with their compound angles, exactly what Simpson hardware we need at the junctions, and what construction skills will be required.
A lot of details are not specified on the original plans, and of course they show skylights instead of cupolas or simple roofs, so I had to fill in a lot of particulars. Perhaps the most notable are that I've made the eaves 24 inches wide on the main roof and 12 inches wide on the cupola, and the cupola roof is raised 21 inches above the main roof. Instead of being plumb, the fascia boards slope in at 25 degrees, which saves a few saw cuts and creates an interesting look.
If one chooses cupolas, then one can debate how their sides should be finished. They could be open, or wood walls (dark inside), or have custom-made windows in aluminum frames (expensive), or basic glass framed in wood (cheap, but perhaps more maintenance). The additional materials cost for the cupolas is small ($337 with open sides, last time I added it up), but they require a substantial amount of additional work. One interesting alternative is to put a cupola only on the largest of the four roofs, and not on the smaller three. Rob says that those who vote for cupolas must also promise to volunteer at least four hours working on the construction. I can't argue with that.
In order to form a useful opinion among the remaining two options, I found that I needed a better idea of what each would look like. So I spent a bunch of evenings building a scale model of two roof units, one with cupola, and one without.
The main beams are 6x6, the cupola hip rafters are 4x4, and the roof surface will probably be 2x8 tongue-and-groove planking. The model is fairly precise in scale (12:1, a foot to the inch) and in the details, so hopefully it helps to visualize how the roofs intersect, how the beams fit together with their compound angles, exactly what Simpson hardware we need at the junctions, and what construction skills will be required.
A lot of details are not specified on the original plans, and of course they show skylights instead of cupolas or simple roofs, so I had to fill in a lot of particulars. Perhaps the most notable are that I've made the eaves 24 inches wide on the main roof and 12 inches wide on the cupola, and the cupola roof is raised 21 inches above the main roof. Instead of being plumb, the fascia boards slope in at 25 degrees, which saves a few saw cuts and creates an interesting look.
If one chooses cupolas, then one can debate how their sides should be finished. They could be open, or wood walls (dark inside), or have custom-made windows in aluminum frames (expensive), or basic glass framed in wood (cheap, but perhaps more maintenance). The additional materials cost for the cupolas is small ($337 with open sides, last time I added it up), but they require a substantial amount of additional work. One interesting alternative is to put a cupola only on the largest of the four roofs, and not on the smaller three. Rob says that those who vote for cupolas must also promise to volunteer at least four hours working on the construction. I can't argue with that.
Nice Job. I'm sure that even working on a model, you have a better appreciation of the difficulties that will come in making the real thing.
Is the $337.00 per cupolas?
Does that include the extra flashing that will be needed?
I sent Kyle pictures of the models and he can look it over.
I like the mixing of both Cupolas and no cupolas. The Large with and the small without doesn't give it an over powering look. Even every other one would be a thought.
Again, nice job. I've worked on many models with Pi-Hsuan and it is time consuming and exhausting.
They should be kept as art work.

That was a lot of work Ken, and nicely done. Thanks.
Do we have anybody with framing knowledge that can make sure that we do this right per code requirements. The framing you describe using 6x6s and 4x4s seems pretty heavy and expensive for a roof that only supports itself, but I'm just asking - I have no framing expertise.
Most roofing I've seen rarely uses lumber thicker than 2" and widths of 4 - 12, occasionally doubled up where needed. Lumber like 6X6 is too heavy to lift and put in place by hand where 2" can be.
So, is our plan to build the roof ourselves?
Do we have at least one expert to supervise?
Will the substantial manpower needed show up?
Flyyyyy
On the Railing:
A friend and I worked on it today some. It made me wonder: where is the thermostat located on the gazebo? It was freaking hot, but I have a supremo farmer's tan now. I hear the ladies can't resist that look.
Anyway, we got half of the total brackets welded on. After testing the strength of it, I opted for a very simple almost invisible single attachment bracket near the top. It reduces my work, made a much cleaner look and lost nothing in strength. The thing is strong and deflection of the tubes from the tension of the rods is negligible. All welds were painted with primer.
I also installed a few more rail posts today. I plan to get more done by the end of the week, but I can't go much farther without a decision on the top cap material. The rail would be susceptible to damage and isn't safe if I install it without the top cap. Hopefully we can get that decided at tomorrow's meeting.
The first 12' section is a little beat up from all the testing and redesigning, including it being installed multiple times. It's scratched up some and a few of the wood cap bolts have been stripped out. This will all be fixed by the time the rail is finished next week.
I also installed a few floor anchors where there is no rail specified. Sorry. I'll fix them by completion, unless we want to keep them to install something else there.
Thanks
Flyyyyy
So the decision at the BOD meeting was to use Douglass Fir for the railng cap and paint it to match a color scheme for the whole pavilion. This will save a lot of money and permit changes in color or even wood later without losing any significant investment. I think it's the best decision at this time. Thanks guys.
I will attempt to purchase the lumber and get it to the LZ this Sunday. It will need to be stacked properly and allowed some time to dry before installation. Installation of the railing will take place next week, after which some more drying time of the wood will be best before painting.
The roof columns can be painted as soon as the paint and volunteer labor show up. If any volunteer wants to paint those columns, don't worry about the rail installation. You can paint around the installed rail. Just cover up the railing where you are painting to avoid needing to clean paint off of it afterward. If you want to paint a column that I have not welded yet, that's fine. I can grind off the paint for the weld and then repaint it easily.
Flyyyyy
We have had a palette for several years:
It requires a minimum of upkeep and visually enhances and supports the architecture, and reflects the natural surroundings: smoothed and sealed concrete aggregate, matt black columns, matt black conduit, natural wood beams, silver standing seam roof.
The roof could even be matt black: It would look pretty cool. Heat transfer is really not an issue.
Matt black doors on the storage. Paint the slab sides (the blocks) matt black to the ground. There will be plants all around it anyway.
Since the club has spent so much money already, doesn't it make sense to make it right?
Today (Sunday 10/16) I finished all the welding for the railing, so the columns can be painted. I'd prefer the brackets be masked off about an inch from the columns so it looks neat. The brackets are stainless, so no paint is needed on them beyond covering the welds and making a clean transition, which I think a simple masking at 1 inch does.
I also delivered all the wood for the rail cap. It is stacked for drying on the Gazebo floor, and Rob said he'll turn it occasionally to help the drying. There are 4 pcs of 2x8x20', and 7 pcs of 2x8x12'.
I plan to cut them to fit each rail section on Wednesday. I will also start installing the railing on Wednesday. If anyone is interested, that would be a good day to help out by sanding and primer coating the cut lumber. I will also be drilling more holes in the concrete and installing anchors and rail posts. Lots to do if you wanna help. I'll bring the equipment needed, for one person on each job, but extra equipment would help if people show up.
Thanks
Flyyyyy
Thanks to all the people who showed up Wednesday to help on the gazebo. Unfortunately, I had a number of snafus getting all the materials and equipment together before I could leave Gardena, so I didn't get there till almost noon, and nobody had my phone number. So I blew the opportunity to make the best use of you guys. I'm really sorry about that.
Despite that, the people who showed did get a lot done. They cut wood for the rail caps, sanded and painted one side with primer, which was a big part of what I hoped to accomplish. So it was not at all wasted. Thanks for getting all that done. It left me free to get a good start on the metal work.
I brought 2 guys with me and we installed the biggest section of rail across the front and welded up a lot of the rods that are needed for the rest, installed more posts and anchors, and delivered most of the remaining material for the rails.
The plan now is for George to get the paint tomorrow and get the caps mostly painted by the weekend, while I continue to install the metal work this week. I'll be there tomorrow and get started early (by 9am) but be leaving by 2pm, and I hope to do the same Friday.
We should get a lot of the rail up before the weekend, and I think it will be completed by next weekend. I still need to design and build the three missing corners that have no roof supports to attach the rail to. I'll make something strong and attractive there, but that will be next week.
I still need to design and quote the stair railings, but that will have to wait till next week also.
I expect that the first R of the three R's (Rail, Roof and Ramp) will be totally complete by early next month, including the stair rails.
Does the ramp need to have a rail too?
Does the retaining wall have strict specs? Can we do that ourselves?
Thanks again guys for the great work today. We got a lot done. Rob has my phone number now.
Flyyyyy