Does the retaining wall have strict specs? Can we do that ourselves?
Ramp railing: No, designed with a 1:20 grade to eliminate rail, except where there may be a drop off. We will avoid that.
Retaining wall: reataining wall specs. Ken obtained a copy of the specs from B&S. Pretty straightforward and, yes, following these to the letter could be handled by volunteers with some basic knowlegde of mixing cement for concrete footings and motar. Using "SpecMix" would help the uninitiated.
When do we start? The ramp needs a project leader. Do we have anyone with experience in this stuff. I only have a degree in ditch digging, but I would be willing to work a couple days a week if we have someone who knows how to lay block for a ramp.
Please don't do anything more with the wood. I need to do something first. Just let it dry out till next week. The paint is still very soft anyway. It's drying very slow.
The thing is, as I've expressed to Rob, I'm very disappointed with the wood. After trying everything to spiff it up, I just think it's gonna be a mistake to use it.
I was all for using the Fir and the painting it, but even after painstakingly picking through the wood at Home Depot, to be blunt, the wood is just crap. The paint won't fix that, and although the routering helps some, it can't fix it either. As I was routering it, huge knots came loose and fell out, and the primer got ruined because it was still not dry. It just can't be made to look like the quality it needs to be.
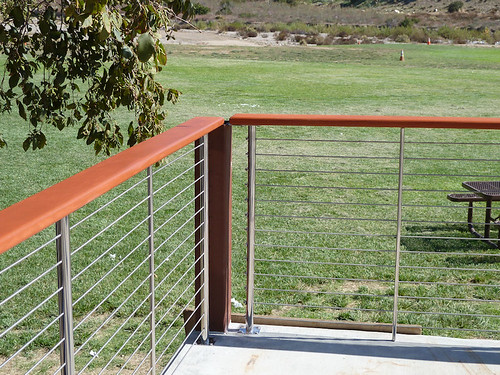
The rail cap is gonna be the main accent feature of the gazebo, because it is right at eye and hand level. If it's crappy, it's gonna matter. There is a lot of money and time in the gazebo, and I personally have a lot of both in the rail in particular. I really don't want to screw it up now.
Although I pushed for and was in agreement with the decision made on the rail cap, I now believe I was wrong. I hope the club will give me some time to find a better solution, sample that, and maybe change that decision. I'm willing to spend my own money and labor to do that if possible. I just need some time to find the right material and sample it on the rail. I think we need a cleaner, more quality look than the painted wood can provide, and I'm willing to pay for it.
I really appreciate all the work everyone did on the Fir caps. I was very impressed with how many people showed up to help and the hard work they did, but I feel that I let you down with the material you had to work with. I hope to show you something much better next week. Please give me the chance to do that.
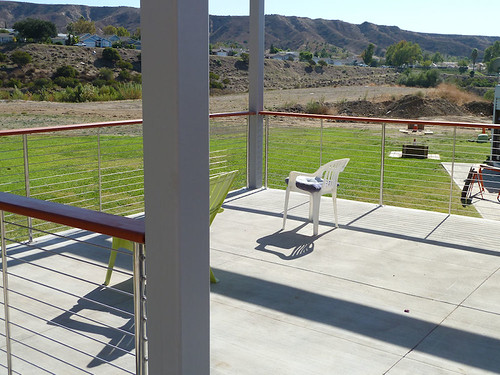
Thanks to all the people who helped this past week with the rail installation. We have 7 of 12 sections up and ready for the caps. The remaining 5 sections are waiting for me to design and build the missing end supports where no roof columns are present. That will get done this coming week.
If it turns out, that we don't use the Fir, I'll reimburse the club for the paint and supplies we bought for it, and I'll eat the cost of the material we used. I'm sorry for this, but give me a little time to fix it.
I would like to take one of the shorter sections home and work with it. I think that it's not a loss-cause and we can make it work nicely. I only saw one that was dented on the side that needs to be replace.
Sure. The router is 1/2" radius. and there is one short piece that is mostly OK, but I still think the painted wood is gonna look cheap compared to the rest of the Gazebo and really distract from the look.
I see two problems with the current wood. 1) The Gazebo is gonna have a more modern look and the painted wood looks dated, almost like it was reused from an old structure. 2) Even if you make one piece look nice, I'm gonna want to replace the rest of it with better quality wood. It's just very defect ridden and it's not possible to fix a lot of that, nor worth the work. I'll pay for that and do the work. After all the work and expense, I want the rail to look like something I'd be proud of. Right now I'm not.
I hope to find something that fits better with the style and has a nice new look. This stuff looks like it came off an old stable. I also think the paint will look bad very quickly. It's gonna show every nick and chip from people pounding stuff on it and scratching it through use. Imagine having a counter top in your home made from painted wood. It will get abused and show it very quickly - each nick and cut adding up until it needs refinished probably every year, with tons of sanding and painting, that nobody but me will want to do.
1. Use what we have so we can start using the deck, then start a search for a permanent solution. I agree that using crappy wood will only lead to problems downstream. That's from personal experience.
2. Think about using Trex for the top railing. Trex is expensive for a whole deck, but just for the top railing it will last forever and will probably be a lot less work than painting and repainting a wood railing. It will also fit into the architecture better.
I also like the idea of powder coated box beams if that can be done for a manageable price.
No matter what we use, the rail cannot be finished until the end of the coming week when I finish the rest of the metal work.
I'm am looking at Trex type materials and others. I most like Greg suggestion of Ipe wood, but I checked it out and that gets very expensive. The thickness is also a problem, since most materials don't come 1-1/2 thick and we need that height. I can fashion some kind of spacers, but again more work and cost, and may detract from the look. I agree that we may finish as we started with the painted wood, but let me try some other things in the next few days, and then we can decide. The wood still needs a lot of work and I don't want us to do that if we end up choosing something else. Regardless, some of the wood sections are just too bad, and I will need to replace them with better boards anyway.
I can do the remaining work on this. You guys need to get the two remaining R's done: Roof and Ramp. Then we can legally use it. As my dog would say: "ROOF ROOF ROOF".
The LPE looks like a great option. The only question I have is why not just use the straight 2X6 (other than price)? That eliminates the pad unless I am reading your proposal wrong. The cost will be about double what you show but we never need to to mess with it again.
I too really wanted Ipe (pronounced "EE pay"). It's incredible wood. So I researched it.
1) I read that is was not recommended for arid climates due to it cracking if it dries out too much. I don't know how much of a problem that would be for us. Probably any wood is gonna crack once it dries out.
2) It's expensive. At most of the sources I found it, 1" X 5-1/2 (actual) was $4-5 per foot plus shipping and the lengths were short requiring seams in most rail sections. So we're talking about $1000 for the material delivered. I don't want to spend that much, but if the club wants too, I'll make it work
3) The biggest problem I see is the thickness. Since most materials come in less than the needed 1-1/2, I have considered spacers like Greg's drawing. Although those larger spacers MIGHT look appropriate, I will also need to make smaller ones for the stringer poles which have a small foot. I think these will probably look like an afterthought no mater how I make them, and there will be one every 3 feet. I'm concerned about that looking bad. I wonder if the inspector would really care if the rail was 1/2" less than 42"? It would look pretty nice if we didn't need the spacers.
~~~~~~~
I'm bringing out a sample of stained redwood to install Tues. afternoon. I'll do the redwood at no additional cost if we want it. It's red of course. Without stain or treatment all woods turn silver gray from weathering. The redwood weatherproofing stain is supposed to last 6 - 8 years, but I suspect it will need redone every 2 -3 years to look new. Not a big deal though - pretty easy. This can be completed this week, and will not need any spacers. The Ipe would probably take two weeks to get done if they ship it quickly.
I'm also recommending going down to 2X6 on the redwood to avoid the angle cuts and I think it will look more appropriate to the metal work and the roof supports. This will be routered with the 1/2" radius as well to give a finished look.
~~~~~~~~~
On the missing end posts where no roof supports are:
I was planning on maybe getting fancy with those with some stainless thing, but since they do not happen to be in locations that are appropriate or balanced, I decided that would not look right. I decided instead to maintain the theme, by getting 6X6 steel material just like the roof supports, which I cut to the same height as the rail. I'll create a strong and matching treatment there somehow, which should look right, blend in, and be sturdy.
I'm also working on a small piece of stainless sculpture for the gazebo, that may or may not be good. We'll see how it comes out, and if it's good enough to live there.
Is our pavilion gonna have an official name like? The Wack Bowl?, Someone Memorial Pavilion?, Thunderdome? Rome's Goffer Sanctuary? or for Janyce: A Bridge Too Far?
Good idea that is what I was thinking. To keep the same look as the rest of the posts you can weld a end plate, bolt it from the inside with a removable top, using a long 3/8 extension to tighten the bolts so there is no flange, or bolt in a 6" high tapped for bolts receiver to the concrete slightly smaller than the 6x6 post then slide the 6x6 over it and bolt it in the tapped receiver. The rail would help with the lateral forces.
Your mind is truly impressive, Seabass. Your first suggestion is exactly what I did. The posts will be bolted from inside so they will have no visible fasteners and will match the others in appearance. They probably will go in tomorrow.
It would help if someone could primer, paint, and seal the bases of them so they match the others.
I installed a stained Redwood cap on one section of rail today. I really like the way it looks, and it was relatively easy to make and finish. Rob Burgis approved my suggestion to just go with that material. It won't cost the club anything extra. I'll do it for the same cost as originally quoted for the Fir. It also will not require any spacers or waiting, so I can get it done quick (by the weekend I hope). If a section gets damaged, the Redwood can be cheaply and easily replaced in one day.
I plan to install the missing 6X6 posts tomorrow and the metal work of the remaining rail sections, if I have time. Then the caps by end of the day on Friday.
The rail got near completion today. Most sections are up with a few to go. Although it may look like a section is finished, many of the screws and bolts have not been installed. It will take one more day's work to finish, which will be early next week.
Today, a lot of work got done by a number of volunteers: The big grader got it's flat tire fixed, the hydraulic oil changed with filter changed and an oil leak fixed.
In preparation for the ramp construction, Greblo, Phil, Seabass, George, Mike and others moved the soda machine, started planning out the electrical and water lines, and some earth got moved, and Geroge was digging ditches. Good start, guys. Things really seemed to be moving today, and people still got some flying in.
For anybody who wants to help, but doesn't quite know what to do, I'd suggest just cleaning up the place. There is construction debris everywhere. Pieces of wood, metal, plastic cardboard, sand bags, dirt, and stuff everywhere. It makes it hard to work. A lot of stuff is just abandoned junk, that nobody feels authorized to throw away. I'd say if it looks like it's been there for months, chances are it's not wanted. If stuff IS wanted, then people should take it home please. That's my two cents.
Thanks for updating the club on activities, and for all you are personally doing for us.
As for the "Junk", I agree totally. It has been hanging around way too long. If there is any doubt about its value, consider relocated to the east of the outhouse with the other "stuff". Please help by clearing anything that doesn't look like it should be there and also help dig dirt out of the 2 storage area just to the east of the back steps.
All sections are installed, but I ran out of stainless screws, so some are missing and some are not stainless. I'll fix all that early this week, but it is all there, except the caps for the shorty 6X6 posts. I'll make those and install them this week as well.
Any errors in the construction, were entirely intentional to provide a "custom - artisan" appearance, which is extremely sought after by connoisseurs of railing culture and other one-percenters.